
How to Fix Common AC Issues in Less Than an Hour a Day

3-Step AC Troubleshooting Before Calling for Service

Before you reach for your phone or budget for a service call, start with three quick checks: confirm the thermostat is set to COOL with fresh batteries, replace a clogged air filter, and inspect the AC breakers and safety switches. These simple steps resolve many common cooling failures in under an hour. A typical service call runs $100 to $250 just for the initial diagnostic visit, yet our technicians find that a clogged filter is the cause of about 70% of "broken" AC calls.
Taking twenty minutes to run through basic diagnostics can get your cool air flowing immediately while protecting you from unnecessary expenses. However, safety must remain your primary concern.
Modern cooling equipment utilizes both low-voltage control circuits (24V) and high-voltage line power (240V). You must always observe standard electrical safety procedures, adhering to basic NFPA 70 guidelines and lock-out/tag-out safety principles. Never reach inside an open electrical compartment, never touch bare terminals, and do not attempt internal mechanical repairs. If basic user-level checks do not restore your cooling, scheduling professional residential AC repair is the safest and most reliable way forward.
Step 1: Check the Thermostat and Settings
Your thermostat acts as the brain of your entire cooling setup. When communication fails between the thermostat and your air handler, the whole system grinds to a halt.
Verify Operating Mode: Check that the system switch is set firmly to COOL, not HEAT or OFF. It sounds basic, but accidental bumps during seasonal transitions or housecleaning happen frequently.
Examine the Fan Setting: Ensure the fan is set to AUTO rather than ON. When set to ON, the blower fan runs continuously 24/7, even when the outdoor compressor is cycling off. This circulates unconditioned, humid, or lukewarm indoor air through your home between cycles.
Perform the 5-Degree Test: Lower your target temperature setting at least 5°F below the current ambient room temperature. This creates an unambiguous call for cooling and triggers the control board relays.
Inspect the Batteries: If your thermostat uses physical batteries (such as AA or AAA alkaline cells), replace them with fresh ones. Weak batteries often display numbers on the screen but lack sufficient voltage to energize the internal 24V switching relay.
Check Smart Thermostat Wiring: Smart thermostats typically require a dedicated common wire (C-wire) to provide steady 24V power. If your smart screen periodically restarts or loses Wi-Fi, it may be experiencing power-stealing brownouts that prevent the cooling relay from latching.

According to the U.S. Department of Energy, installing and properly scheduling a programmable thermostat can save you up to 10% a year on heating and cooling expenses.
Step 2: Inspect Air Filters and Vents
Airflow is the lifeblood of any air conditioning system. When airflow drops below designed specifications, heat transfer fails completely, leading to frozen coils, high utility bills, and mechanical shutdown.
Examine the Filter Media: Pull your air filter from the return grille or furnace cabinet. Hold it up to a light source. If light cannot pass through the weave, replace it immediately. For most standard residential systems, we recommend pleated filters rated between MERV 8 and MERV 11. Higher ratings (such as MERV 13+) can trap micro-particles but may restrict static airflow in older duct systems unless specifically calibrated by an HVAC installer.
Inspect Supply Registers: Walk through your living spaces and confirm that supply registers are fully open and unblocked. Closing off more than 15–20% of your home's registers creates severe duct static pressure imbalances, stressing the blower motor and causing duct leakage. Duct leaks can reduce a system's efficiency by as much as 20%.
Check Return Air Grilles: Ensure large return grilles are not blocked by furniture, heavy drapes, or area rugs. Your air conditioner needs an unobstructed intake volume to maintain proper coil temperatures, as detailed in established HVAC diagnostic procedures.
Step 3: Check Breakers, Disconnects, and Safety Switches
An air conditioner relies on multiple electrical pathways and built-in safety interlocks to prevent property damage and catastrophic equipment burnout.
Main Electrical Panel Breakers: Air conditioners utilize two separate circuits: a 120V circuit for the indoor blower/furnace and a 240V double-pole circuit for the outdoor condenser. Locate these breakers in your home's main panel. If the 240V breaker has tripped, it will rest in a middle position between ON and OFF. Firmly switch it to the OFF position, wait thirty seconds, and flip it back to ON. Follow the single-reset safety rule: if the breaker trips again immediately or during the next startup, do not reset it again. Repeated tripping indicates a short circuit, failed capacitor, or grounded compressor winding that requires a professional diagnosis.
Outdoor Service Disconnect: Located on the exterior wall near your outdoor unit, this weather-resistant metal box houses a pull-out handle or toggle switch. Ensure the disconnect handle is firmly seated in the ON position.
Condensate Float Switch: Modern air handlers feature an overflow safety float switch installed on the primary drain pan or PVC drain line. If your drain line backs up with sludge, the float rises and cuts off the low-voltage 24V circuit to prevent water damage to your ceilings and floors.
Blower Door Safety Interlock: The access panel covering your indoor blower motor features a spring-loaded safety switch. If this panel is loose or misaligned after a filter change, the switch stays open and completely cuts 24V power to the entire system.
Why Your AC Runs But Isn't Cooling: Quick DIY Fixes
When you feel your vents blowing air, but the rooms remain stuffy and warm, your indoor blower fan is running while your outdoor condenser unit is failing to remove heat from the home.
You can measure this performance using the Delta-T ($\Delta T$) temperature split. Use an infrared or digital probe thermometer to measure the air temperature entering your return grille, then measure the cool air exiting the nearest supply register. A healthy, properly functioning system produces a temperature drop of 15°F to 20°F. If your temperature split measures under 12°F, your system is running with compromised capacity.
Routine, preventative AC maintenance prevents the majority of these heat-transfer failures.
How to Handle a Frozen Evaporator Coil
Finding frost or a thick block of ice encasing your copper refrigerant lines or indoor evaporator coil is an alarming sight. Ice acts as an insulator, blocking all airflow and potentially sending liquid refrigerant back to the compressor, which can cause permanent mechanical failure.
Turn Cooling Mode Off Immediately: Switch your thermostat setting from COOL to OFF. Leaving the cooling mode engaged while the coil is frozen will cause severe compressor stress and thermal overload.
Switch the Fan to ON: Turn the fan switch to ON. This forces warm ambient air through the ductwork and over the frozen indoor coil, accelerating the thawing process.
Allow 2 to 4 Hours to Thaw: Do not attempt to chip, scrape, or pick away ice using knives, screwdrivers, or sharp tools. The aluminum fins and copper tubing are delicate; puncturing a tube will immediately discharge the system's pressurized refrigerant charge.
Protect Against Drain Pan Overflow: As the ice block melts, it produces a high volume of water. Monitor your indoor drain pan and place towels around the air handler cabinet to capture any overflow if the primary drain line flows slowly.
Check the Root Cause: The two primary causes of a frozen coil are restricted airflow (accounting for ~60% of cases, typically caused by a severely clogged filter) and low refrigerant charge (~40% of cases, caused by a leak). Replace your filter before attempting to restart the system.
Clearing Outdoor Condenser Debris and Obstructions
Your outdoor condensing unit dumps the heat collected from inside your house into the surrounding outdoor atmosphere. If the outdoor coil's aluminum fins are blocked, heat cannot escape, forcing the compressor to run at dangerously elevated head pressures. In fact, outdoor coils that haven't been cleaned in 5 years lose about 20% of their operational capacity.
Maintain the 24-Inch Clearance Rule: Inspect the area surrounding your outdoor unit. Trim back shrubs, trees, tall weeds, and decorative grasses so that there is at least a 24-inch unobstructed perimeter around the cabinet, along with five feet of overhead clearance.
Clear Loose Debris: Shut off power at the outdoor disconnect switch. Gently pick away leaves, twigs, cottonwood fluff, and lawn clippings collected against the exterior metal cabinet.
Perform a Low-Pressure Hose Rinse: Using a standard garden hose equipped with a multi-pattern spray nozzle, aim the water stream downward at a 45-degree angle through the aluminum fins. Never use a high-pressure power washer. High-pressure spray easily bends and crushes fragile aluminum fins, permanently restricting air circulation across the coil.
Straighten Bent Fins: If fins have been crushed by hail, lawn equipment, or pets, use an inexpensive HVAC fin comb tool matched to your unit's fins-per-inch (FPI) spacing to gently realign them.
Diagnosing Airflow, Drainage, and Short-Cycling Problems
Air conditioning issues do not just involve total shutdowns; restricted drainage and rapid on-off cycling can silently ruin your equipment and cause extensive property damage.
Advanced AC Troubleshooting for Short-Cycling Systems
Short-cycling occurs when your air conditioner starts up, runs for a brief period (1 to 5 minutes), abruptly shuts off, and then restarts a few moments later without satisfying the thermostat's setpoint. This rapid cycling is exceptionally damaging.
Each compressor start consumes approximately 5× steady-state running current and places massive electrical and mechanical stress on the motor windings. Over time, unaddressed short-cycling can cut compressor service life by 30% to 50%.
Symptom / Cause | Root Issue | Impact on System | Recommended Action |
Severely Clogged Air Filter | Restricted return airflow causes evaporator to overheat or freeze | High-limit switch trips; coil freezes; blower motor overheats | Replace filter immediately with a MERV 8–11 unit; restore free airflow. |
Failing Run Capacitor | Weak electrical storage drops voltage to compressor or fan motor | Motor draws high amps, overheats, and trips internal thermal overload | Call an HVAC technician to safely discharge, test, and replace the capacitor. |
Oversized AC Equipment | System cooling capacity drastically exceeds home square footage load | Rapidly cools air without dehumidifying; extreme compressor start-stop cycles | Consult a professional to evaluate duct staging, blower speeds, or system resizing. |
Tripped Float Switch | Intermittent condensate drainage blockage floats the safety switch | Shuts down 24V control circuit intermittently as water slowly seeps down | Clear the primary PVC condensate line; flush drain line with distilled vinegar. |
Low Refrigerant Charge | Refrigerant leak drops low-side pressure below safety cut-out | Low-pressure safety switch trips compressor to prevent total burnout | Turn off system and call a certified technician to perform electronic leak detection. |
Clearing a Clogged Condensate Drain Line Safely
During a humid summer, your air conditioner can extract up to 5 to 20 gallons of water per day from your indoor air. This moisture collects in the indoor evaporator drain pan and drains through a dedicated 3/4-inch PVC line. Over time, dark, damp drain lines accumulate algae, mold, and dust sludge, forming a thick gelatinous clog.

To diagnose and clear this safely, following the structured HVAC troubleshooting framework, perform these steps:
Locate the PVC T-Pipe: Find the open vertical PVC access pipe near your indoor air handler or furnace.
Inspect for Standing Water: If water fills this vertical pipe or sits in the emergency drain pan below the air handler, you have an active clog.
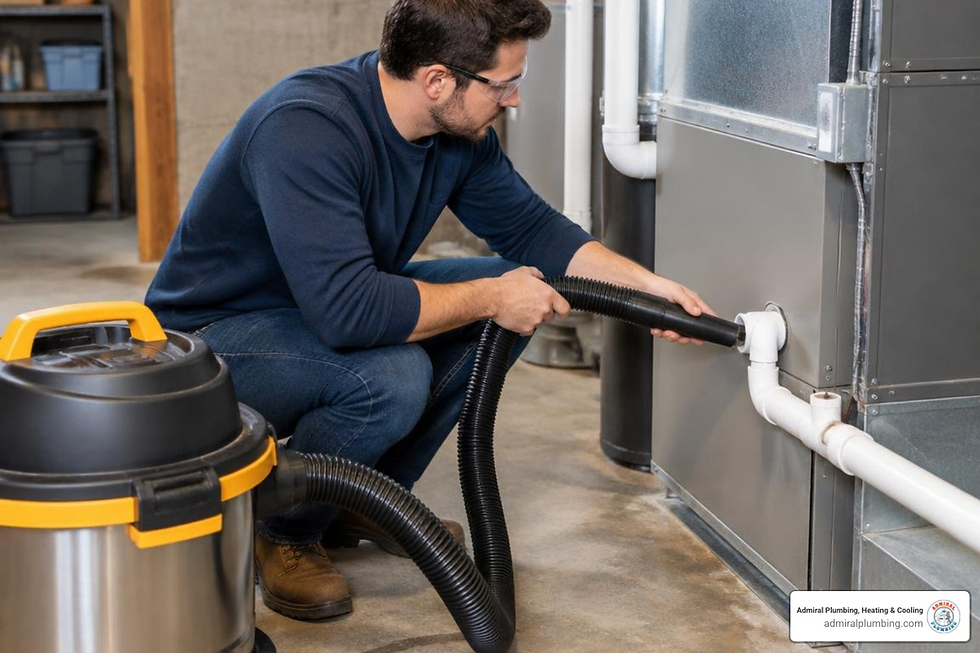
Use a Wet/Dry Vacuum: Go to the exterior of your home where the PVC drain line terminates (usually near the outdoor condenser). Firmly seal your wet/dry vacuum hose around the PVC exit pipe using a towel or rubber coupling. Run the vacuum for two to three minutes to pull the algae clog and accumulated water completely through the line.
Flush With Distilled Vinegar: Return to the indoor vertical T-pipe. Pour one to two cups of regular distilled white vinegar down the line. The mild acid breaks down remaining microbial slime without softening or degrading the PVC plastic joints. Avoid harsh chemical drain cleaners (such as lye or bleach mixtures), which can corrode metal drain pans and release toxic fumes into your ductwork.
Inspect the Drain Pan: Check the internal pan for hairline cracks or severe rust that could cause water to bypass the drain line entirely.
Decoding Strange AC Noises and Refrigerant Leak Warning Signs

Air conditioners produce a steady, familiar hum when operating normally. When new, sharp, or unusual sounds emerge, they serve as early warnings of mechanical or electrical component failures.
Identifying Rattling, Buzzing, Squealing, and Hissing Sounds
Rattling or Clattering: Often caused by loose cabinet screws, vibrating access panels, or a loose fan blade on the outdoor condensing unit. If the rattle comes from deep inside the compressor casing, it may indicate loose internal mounting springs or mechanical hardware failure.
Electrical Buzzing or Humming: A strong electrical buzz typically signals a failing contactor relay switch whose contacts have pitted or burned, or a failing motor capacitor struggling to deliver starting torque. If you hear a loud hum while the outdoor fan motor refuses to spin, shut the system off immediately to prevent burning out the motor windings.
High-Pitched Squealing or Screeching: Squealing often points to worn internal bearings in the indoor blower motor or the outdoor condenser fan. If you hear a piercing, metal-on-metal screeching sound coming directly from the compressor, shut the unit down instantly—this indicates dangerously high internal head pressures or severe compressor mechanical failure. Promptly contact emergency air conditioning services to prevent complete system destruction.
Hissing or Bubbling: A distinct hissing sound near the indoor evaporator coil or outdoor copper lines indicates a high-pressure refrigerant leak. A bubbling or gurgling sound indicates air and moisture contamination inside the sealed refrigeration loop.
Signs of Refrigerant Leaks and EPA Section 608 Regulations
An air conditioner does not "consume" or "burn" refrigerant. The refrigerant charge operates in a permanently sealed, closed loop. If your system is low on refrigerant, it has an active leak.
Common indicators of a refrigerant leak include:
Indoor air blowing lukewarm despite the outdoor compressor running continuously.
Ice forming along the insulated copper suction line (the larger copper pipe) all the way to the outdoor unit.
Noticeable hissing sounds around the indoor evaporator coil or outdoor service valves.
Unexplained, sharp increases in your monthly electric utility bills due to continuous runtimes.
Refrigerant handling is strictly regulated under federal law. Furthermore, as the HVAC industry transitions through modern regulatory changes and phases down legacy hydrofluorocarbons, certified technicians must employ specialized electronic leak detectors, ultrasonic sniffers, and recovery equipment to isolate leaks, braze copper tubing, and recharge systems according to exact manufacturer subcooling and superheat specifications.
Repair vs. Replace: Applying the $5,000 Rule to Your AC
When dealing with a major air conditioning breakdown, every homeowner faces the same dilemma: should you pay to fix the existing unit, or invest in a full AC replacement?
The typical lifespan of a central air conditioning condensing unit is 12 to 15 years, whereas a gas furnace generally lasts 15 to 25 years. If your cooling system is approaching or exceeding its twelfth year of operation, major component repairs often yield diminishing financial returns.
Example A (Repair): Your 6-year-old system needs a new condenser fan motor costing $600. $$\text{Calculation: } 6 \times \$600 = \$3,600 \quad (\text{Under } \$5,000 \rightarrow \mathbf{Repair})$$
Example B (Replace): Your 12-year-old system suffers a compressor burnout costing $1,800 to fix. $$\text{Calculation: } 12 \times \$1,800 = \$21,600 \quad (\text{Far exceeds } \$5,000 \rightarrow \mathbf{Replace})$$
Modern cooling systems engineered to current SEER2 efficiency standards are roughly 30% to 40% more efficient than units installed 15 years ago. Upgrading an aging, inefficient unit delivers immediate reductions in monthly utility bills, provides quieter operation, eliminates obsolete refrigerants, and restores full manufacturer parts warranty protection.
DIY vs. Professional AC Troubleshooting: Where to Draw the Line
Knowing what tasks you can safely tackle versus what requires an expert protects your equipment, your safety, and your manufacturer's warranty.
Maintenance or Repair Task | DIY Safe? | Professional Required? | Primary Safety & Operational Hazards |
Air Filter Replacement | YES | No | Safe task. Restores essential system airflow and indoor air quality. |
Thermostat Battery & Setting Check | YES | No | Safe low-voltage control check. |
Exterior Debris Removal & Hose Rinse | YES | No | Safe when using low-pressure garden hose; never use high-pressure washers. |
Flushing Condensate Line with Vinegar | YES | No | Safe maintenance. Prevents microbial pan sludge and float-switch shutoffs. |
Straightening Bent Exterior Coil Fins | YES | No | Safe when using appropriate plastic/metal fin comb; avoid puncturing tubes. |
Testing/Replacing Run Capacitors | NO | YES | High Voltage / Shock Hazard. Capacitors hold lethal charges even when power is off. |
Diagnosing High-Voltage Contactors | NO | YES | 240V Electrocution Risk. Requires live testing with calibrated multimeters. |
Refrigerant Leak Detection & Recharging | NO | YES | EPA 608 Violation. High-pressure gas hazards (250–500+ PSI), chemical burns. |
Deep Cleaning Evaporator Coils | NO | YES | Requires opening air handler cabinet, handling sheet metal, and protecting drain pans. |
Compressor or Fan Motor Replacement | NO | YES | Mechanical alignment, wiring schematics, and brazing requirements. |
Routine professional AC tune ups allow licensed technicians to inspect these critical electrical and mechanical components before they fail under peak summer heat loads.
Frequently Asked Questions About AC Troubleshooting
How long does it take for a frozen AC coil to thaw completely?
A frozen evaporator coil typically takes 2 to 4 hours to thaw completely when you turn the cooling mode OFF and switch the indoor blower fan to ON. If the coil is encased in a solid block of ice, it can take up to 6 hours. Never use sharp metal tools or heat guns to accelerate thawing, as this can puncture the copper tubes and release pressurized refrigerant.
Why does my AC breaker keep tripping after I reset it once?
If an AC circuit breaker trips repeatedly, it is actively protecting your home from an electrical fire or total equipment burnout. Common causes include a failing run capacitor, an internally shorted fan motor, or a compressor with grounded electrical windings that is drawing massive amperage upon startup. Never force a breaker to stay on, and never replace it with a larger breaker. Leave the breaker off and call an HVAC professional.
Can a dirty air filter really cause my entire AC system to shut down?
Yes. A heavily clogged air filter restricts airflow across the indoor evaporator coil, causing coil temperatures to plunge below 32°F. Moisture on the coil freezes into ice, blocking all air circulation. The resulting lack of heat transfer can cause the compressor to overheat and trip its internal thermal overload switch, or the melting ice can fill the drain pan, triggering the float switch to cut off all power to the system.
Professional Cooling Solutions in Northern Utah
When basic troubleshooting steps like checking your filter, thermostat, and breakers don't restore your comfort, the team at Admiral Plumbing, Heating & Cooling is here to help. Serving Provo and surrounding Northern Utah communities, our licensed and EPA-certified technicians provide reliable diagnostics, routine maintenance, and complete system repairs.
With our 24/7 emergency service, A+ BBB rating, and commitment to transparent pricing, we take the stress out of cooling breakdowns. If your air conditioner is making unusual noises, blowing warm air, or repeatedly tripping breakers, don't sweat through the heat.
Explore our detailed troubleshooting breakdown to learn why units fail under heavy evening cooling loads, or contact our service team today to schedule your comprehensive diagnostic inspection.


Comments