
Stop the Shivers by Cleaning Your Lennox Flame Sensor Today

Updated: Oct 6
Why Your Lennox Furnace Keeps Shutting Off (And How to Fix It Fast)

Cleaning a Lennox flame sensor is one of the quickest DIY fixes for a furnace that ignites but shuts off within seconds. Here's how to do it:
Turn off power at the circuit breaker and shut off the gas supply
Remove the access panel to expose the burner assembly
Locate the flame sensor — a small metal rod near the burners, usually on the left side
Unscrew the sensor using a 1/4" or 5/16" nut driver
Lightly rub the metal rod with fine-grit sandpaper (400–600 grit) or steel wool until it looks bright and clean
Wipe away dust with a dry cloth or paper towel
Reinstall the sensor, restore power and gas, then test the furnace
Monitor for 20 minutes — if it runs without shutting off, you're good
It's a cold Utah County night and your furnace fires up — but then dies within seconds. It tries again. Same result. Then nothing.
Sound familiar?
A dirty flame sensor is one of the most common reasons this happens. Over time, a thin layer of oxidation and carbon buildup coats the sensor rod.
That coating acts like an insulator, blocking the tiny electrical signal the sensor needs to tell your furnace "yes, there's a flame — keep the gas flowing." Without that signal, the furnace shuts down as a safety measure.
The good news? In most cases, you don't need a service call. Cleaning the flame sensor takes less than 30 minutes and costs almost nothing.
This guide walks you through exactly how to do it safely on common Lennox models — including the notoriously tight G61 and G43UF — and tells you when it's time to stop DIYing and call a pro.
Understanding the Lennox Flame Sensor and How It Works
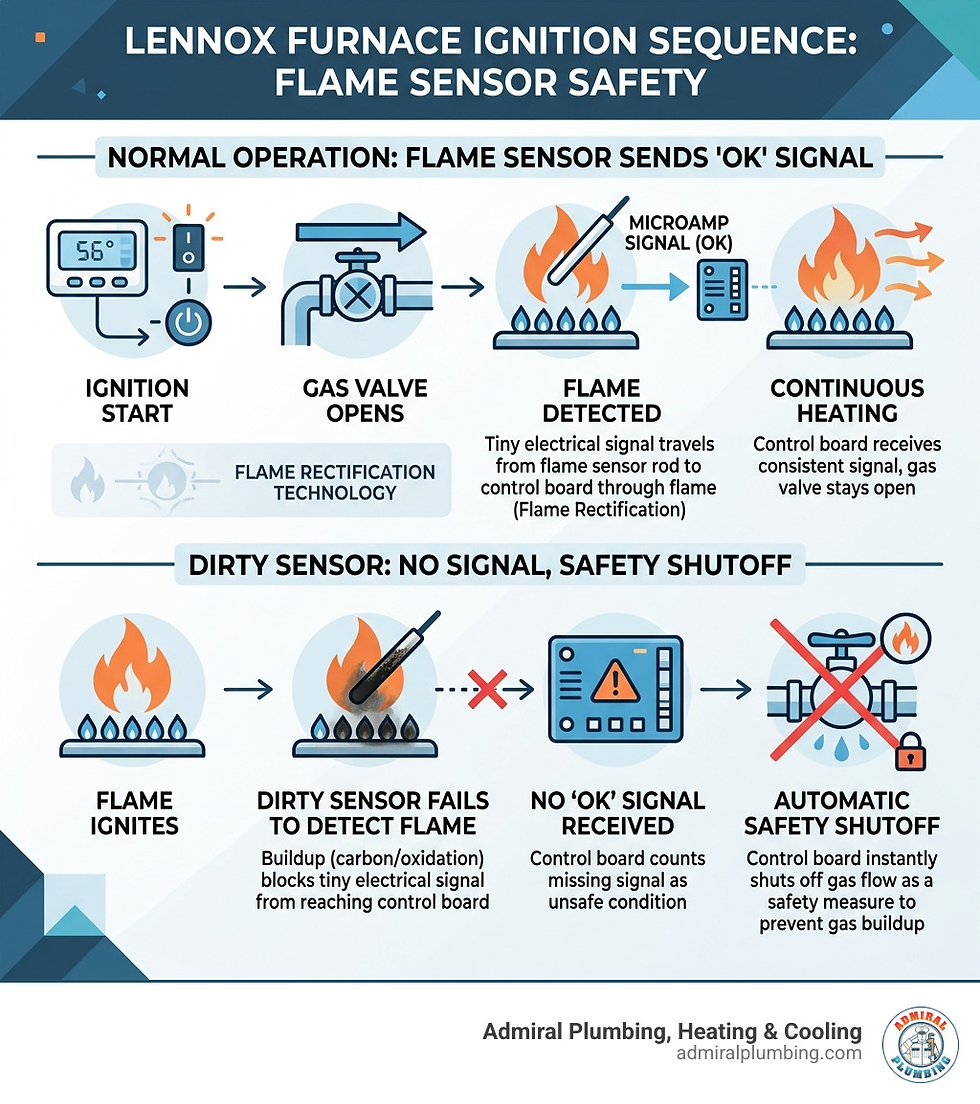
To fix the problem, it helps to understand what this little piece of metal actually does. In your Lennox furnace, the flame sensor is a critical safety component. It doesn't just "see" the fire; it uses a scientific principle called flame rectification.
When the burners ignite, the flame creates a path for electricity. The furnace control board sends a small alternating current (AC) to the sensor. The flame itself acts as a conductor, converting that AC signal into a tiny direct current (DC) measured in microamps.
This microamp signal travels through the flame to the grounded burner assembly and back to the control board.
If the board receives a steady signal (typically between 1 and 10 microamps for a healthy Lennox system), it knows it is safe to keep the gas valve open. If the sensor is dirty, the carbon buildup acts as an insulator, preventing the current from flowing.
The board assumes no flame is present and shuts the gas off immediately to prevent unburned gas from filling your home. You can learn more about how these parts interact in this Flame Sensor for Lennox Furnace Guide.
Because this part lives inside the combustion chamber, it is constantly exposed to high heat and microscopic debris. This is why regular furnace maintenance is so vital—it catches these tiny issues before they leave you shivering in the middle of January.
Signs You Need to Prioritize Cleaning Lennox Flame Sensor Components
How do you know the flame sensor is the culprit and not something more serious like a failing gas valve or a cracked heat exchanger? Here are the hallmark symptoms:
Short Cycling
The furnace starts, the burners ignite for 2 to 5 seconds, and then the flame abruptly goes out. The system may try this three times before entering a "lockout" mode.
LED Error Codes
Most Lennox models have diagnostic lights on the control board (visible through a small porthole). A specific pattern, such as "1 Flash" or "Continuous Flashing," often indicates a flame sensing failure.
Visual Soot or Oxidation
If you pull the sensor and it looks black, charred, or covered in a white, chalky substance, it’s definitely time for a cleaning.
It is important to distinguish between a simple dirty sensor and a dangerous cracked heat exchanger. While both can cause furnace issues, a cracked heat exchanger is a major safety hazard.
Symptom | Dirty Flame Sensor | Cracked Heat Explorer |
Flame Appearance | Blue and steady before cutting out | Flickering, "dancing," or yellow |
Furnace Behavior | Shuts down within seconds of ignition | May run but produce smells or soot |
Sound | Normal ignition click and whoosh | Possible whistling or banging |
Safety Risk | Low (nuisance shutdown) | High (Carbon Monoxide risk) |
Step-by-Step Guide to Cleaning Lennox Flame Sensor Rods Safely
Before we dive in, remember: safety first! We are dealing with electricity and gas. If you feel even slightly uncomfortable, don't hesitate to call us for professional furnace cleaning.

Tools and Materials Needed
1/4" and 5/16" nut drivers (or a socket set)
Fine-grit sandpaper (400 to 600 grit) or a piece of steel wool
A clean, dry paper towel or cloth
A flashlight
Optional: Isopropyl alcohol and a multimeter
The Cleaning Process
Kill the Power: Switch off the furnace at the dedicated circuit breaker or the service switch located on the side of the furnace.
Shut off the Gas: Turn the manual gas valve (usually a yellow or red handle on the pipe leading into the furnace) to the "off" position.
Remove the Panels: Lift off the upper and lower furnace doors.
Locate the Sensor: Look for a single wire leading to a small porcelain block with a metal rod sticking into the path of the far-left or far-right burner.
Unscrew and Remove: Use your nut driver to remove the single screw holding the sensor in place. Carefully pull the sensor out, being mindful not to drop the screw into the dark abyss of the furnace cabinet!
Clean the Rod: Use your sandpaper or steel wool to gently scrub the metal rod. You aren't trying to grind it down; you just want to remove the dull oxidation until the metal looks bright and shiny. For more details on this technique, check out this Step-by-Step Guide to Clean a Flame Sensor.
Wipe and Reinstall: Wipe the rod with a dry paper towel to remove any grit. Slide it back into its slot, replace the screw, and reconnect the wire.
Locating the Sensor on G61 and G43UF Models
If you own a Lennox G61 or G43UF, you might find that the sensor is a "real pain in the butt" to reach, as many HVAC techs say. These models often have tight burner boxes where the sensor is tucked behind other components like the inducer tee or the manifold.
Pro Tip: Use a magnetic nut driver or a bit extension. On some G61 models, it is actually easier to remove the four screws holding the entire burner box or manifold to gain clear access. If you find yourself struggling to reach the screw, don't force it—stripping the screw head will turn a 20-minute job into a multi-hour headache.

Best Practices for Cleaning Lennox Flame Sensor Surfaces
While cleaning lennox flame sensor rods is straightforward, there are a few "dos and don'ts" to keep your furnace happy:
Don't touch the porcelain
The white ceramic insulator is fragile. If it cracks, the electricity will "leak" to the furnace frame instead of going through the flame, and the sensor will fail regardless of how clean the metal is.
Avoid heavy oils
Never use your bare fingers to touch the cleaned metal rod. The oils from your skin can burn on and create a new layer of carbon.
The Multimeter Test
If you want to be 100% sure the fix worked, use a multimeter set to DC microamps (µA). Connect it in series with the flame sensor wire. When the furnace ignites, you should see a reading between 1.0 and 10.0 µA.
If it's below 1.0, the sensor is likely still dirty or failing. This type of testing is a standard part of our professional furnace tune-ups.
When to Replace Instead of Cleaning Your Lennox Sensor
Cleaning usually works, but it isn't a permanent fix for a physically damaged part. You should opt for a replacement if:
The porcelain insulator is cracked or wiggly.
The metal rod is significantly bent, rusted, or pitted.
The furnace continues to short cycle even after a thorough cleaning.
When buying a replacement, we always recommend OEM (Original Equipment Manufacturer) Lennox parts. While universal sensors exist, Lennox control boards can be picky about the resistance levels of the sensor. Using the wrong part can void your warranty.
You can find your specific part number on the furnace's data plate (the sticker inside the cabinet with the model and serial numbers). If you're unsure, our team can help with expert furnace repair and part sourcing.
Frequently Asked Questions about Lennox Furnace Maintenance
How often should I be cleaning lennox flame sensor parts?
For most homes in Provo and the surrounding Northern Utah areas, we recommend cleaning lennox flame sensor components once a year as part of your pre-winter prep.
However, if you have a very dusty home, pets that shed, or if you've recently done a home renovation (drywall dust is a sensor killer!), you may need to clean it twice a season. As we head into the April 2026 maintenance window, checking your sensor now can prevent a late-season breakdown.
Keeping up with residential furnace maintenance is the best way to extend the life of your HVAC system.
What tools are required for a DIY furnace fix?
You don't need a massive workshop to handle this. A basic DIY kit for this job includes:
Nut Drivers: 1/4" and 5/16" are the industry standards for Lennox.
Abrasive: 600-grit sandpaper or a "green" Scotch-Brite pad.
Flashlight: It's dark inside that burner box!
Multimeter: If you want to get technical and verify the microamp signal.
Can a dirty sensor cause a carbon monoxide leak?
A dirty flame sensor itself does not produce carbon monoxide (CO). In fact, the sensor's job is to prevent danger by shutting the system down. However, the same things that make a sensor dirty—like poor combustion or clogged burners—can also lead to inefficient burning and CO production.
If your sensor is constantly getting dirty, it might be a sign that your burners need a professional adjustment to ensure a clean, safe burn.
Conclusion
A furnace that won't stay lit is more than just an inconvenience; in the middle of a Utah winter, it's a safety issue. Cleaning a Lennox flame sensor is a high-reward DIY task that can save you time and money. By following the steps above, you can restore your home's comfort in less time than it takes to watch a sitcom.
However, we know that not everyone is comfortable opening up their furnace cabinet, and some Lennox models make access incredibly difficult for the average homeowner.
If you've cleaned the sensor and the problem persists, or if you'd simply rather have an expert handle the "dirty work," Admiral Plumbing, Heating & Cooling is here to help.
We serve Provo and all of Northern Utah with 24/7 emergency service and an A+ BBB rating. Whether you need a quick sensor cleaning or a full system replacement, our technicians have the tools and experience to get the job done right the first time.


Comments